
I make videos, produce podcasts, write every weekday, and I travel a lot. That means that I use a ton of gear & devices. I tend to get a lot of questions about what camera I’m using, what programs help me stay organized, and what other kinds of tools are helping me stay at the top of my game as a solo creator.
Here it is! If I’m missing something, feel free to ask me & I’ll update this as soon as I can.
Most recent update: Feb 8th 2024
Video Kit
Sony ZV-e10
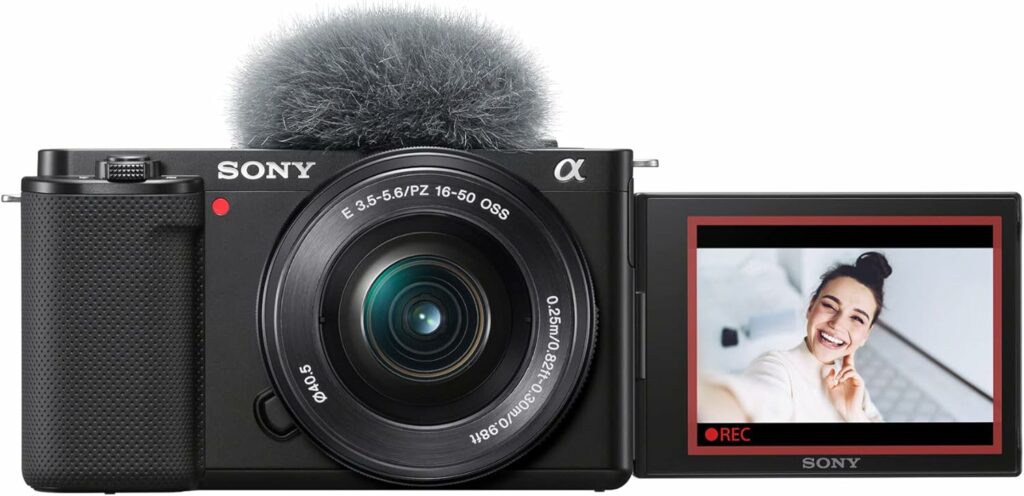
After using the Sony ZV-1 for awhile, I wanted to stretch my legs with a camera that let me swap out lenses. I don’t have many of them, but the ones I have are pretty dang sweet (I’ll show you the one I’m talking about here in a second).
The battery life on this one is way better than the ZV-1, and having said that it’s not awesome in its own right; just a lot better than the one I’m used to.
The Lens: Sigma 16mm f/1.4
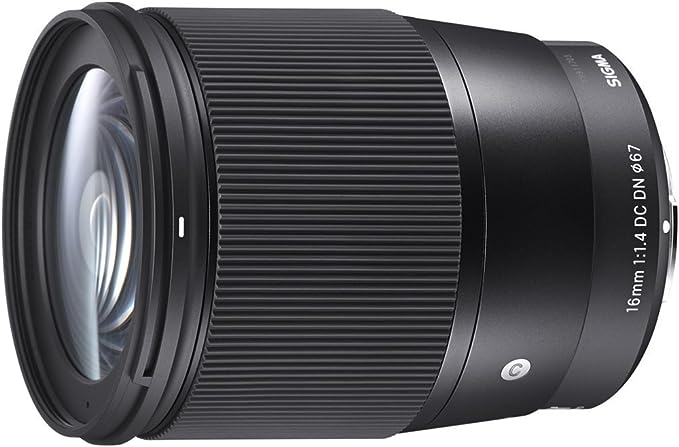
I originally got this for my Sony a6400 that I got for my zoom shows. I needed a lens that would work great in low light & be able to have lazer-sharp autofocus (since I’d need the lens to focus on the playing card I’m showing the camera, and then have it snap back to my face when the card was out of frame).
Its aperture can open WAY up (that’s what the 1.4 means), and that means it works well in low light AND it does that beautiful blurry background thing I was looking for. Now, when you’re watching any of my YouTube videos and the whole shot is out of focus and only I’m in focus? This is the lens that’s doing it.
Plus, this was the lens just sitting around on my a6400 that doesn’t get much love nowadays as most of my events are back in person. Instead of bringing the a6400 along on the road (because it’s a little clunky), I wanted to get another Sony that let me swap out lenses, but felt a little lighter to travel with. That’s why I grabbed the ZV-e10.
The Cage: SmallRig
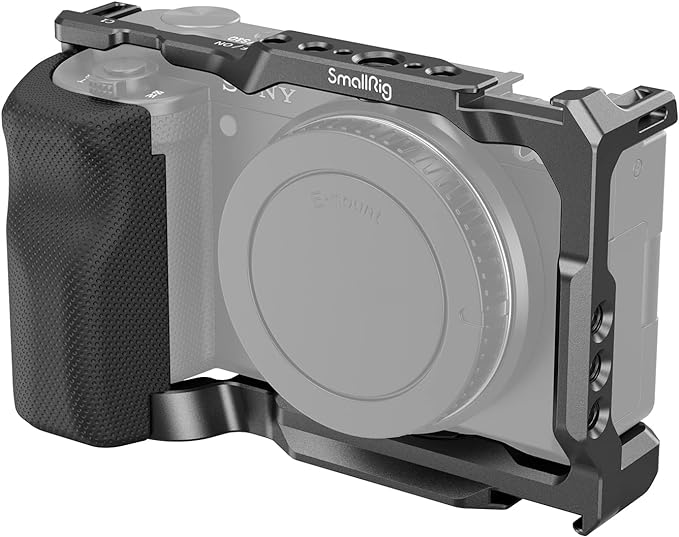
The road is an unforgiving gauntlet for electronics.
I’m constantly banging things around. This is why I don’t wear expensive watches on tour. I wear a $30 Casio that I love so much but I don’t pretend like it’s going to be a family heirloom.
I know myself, and that’s why I wanted to get a cage for the camera. It helps protect the body of the camera and it also works as a solid place to mount all the extra goodies I want to use.
Since SmallRig worked so well with my previous camera, I figured I’d stick with the same brand.
The Mic: DJI Mic 2
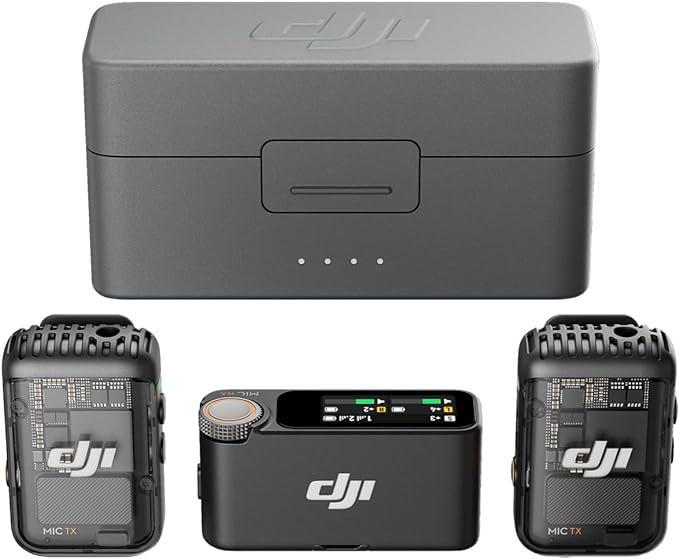
This is the most recent upgrade I’ve made to the kit.
After years of walking around with the Deity shotgun mic & having so many people stop me at airports to ask me what it is, I wanted to level up my game.
While the shotgun mic does well with the camera at arm’s length, it has serious issues if I want to be any farther from the camera. That’s why I needed something else, and this is it.
With this wireless transmitter / receiver I can be 800+ feet from the camera and it still sounds like I’m standing right next to it. Plus, there are a lot of other reasons why this is my choice:
- 32-bit float (no peaking!),
- local recording (yay audio backup in case the connection craps out and the camera doesn’t get audio), and
- it comes with 2 mics (now I can interview 2 people at once if I wanted. I don’t want to, but I COULD).
Cold Shoe Mount

Unfortunately, with the cage on the camera, the DJI Mic 2 receiver won’t go into the camera’s cold shoe mount. I had to buy this little guy, bolt it onto the cage, and then put the receiver in this.
There’s a little bit of play with the receiver, but it hasn’t come out after bonking it around for an extended time.
I had tried a previous cold shoe adapter that has spring loaded bearings that should keep the mic secure, but I’d look down and the receiver is dangling by its audio cable, hanging on for dear life. No good.
Got rid of the one that felt secure but wasn’t in favor of this one that feels less secure (remember the little bit of play), but is more secure.
The Strap: Blackrapid Street Camera Sling

Prepare yourself for a seriously niche discussion here.
When I’m traveling I’m almost always wearing a backpack. I always put the camera strap on first, then the backpack.
That means if I go with a traditional 2-point camera strap, then the backpack clamps the strap down and I can’t bring the camera up. It’s locked into place.
If I wanted to take a photo or get some footage real quick, I’d have to hoist my backpack up, shift the strap, then I can do what I need to do. Since I’m often carrying a lot of stuff in my backpack, it can be tough to move that cumbersome weight around behind me.
Solution: A camera strap that lets the camera move independently of the strap!
This is it. The Blackrapid strap has a really cool connector that slides independently of the strap. The strap stays in place and the camera rests on your hip, right by your hand. When you want to take a shot the camera is waiting on you, grab it, and bring it up as the connector ring moves up and the strap stays put. Genius.
Additionally, it has a safety strap that connects to the strap in a different way so you have 2 points of contact. If one fails, the other is there as a backup. You don’t get that with a traditional “one end of the strap on either side of the camera” approach. If one of those goes, there goes your camera!
So I love the independent connections + the ability to keep the strap in place and still get the camera in & out of play. Marvelous.
Quick Release
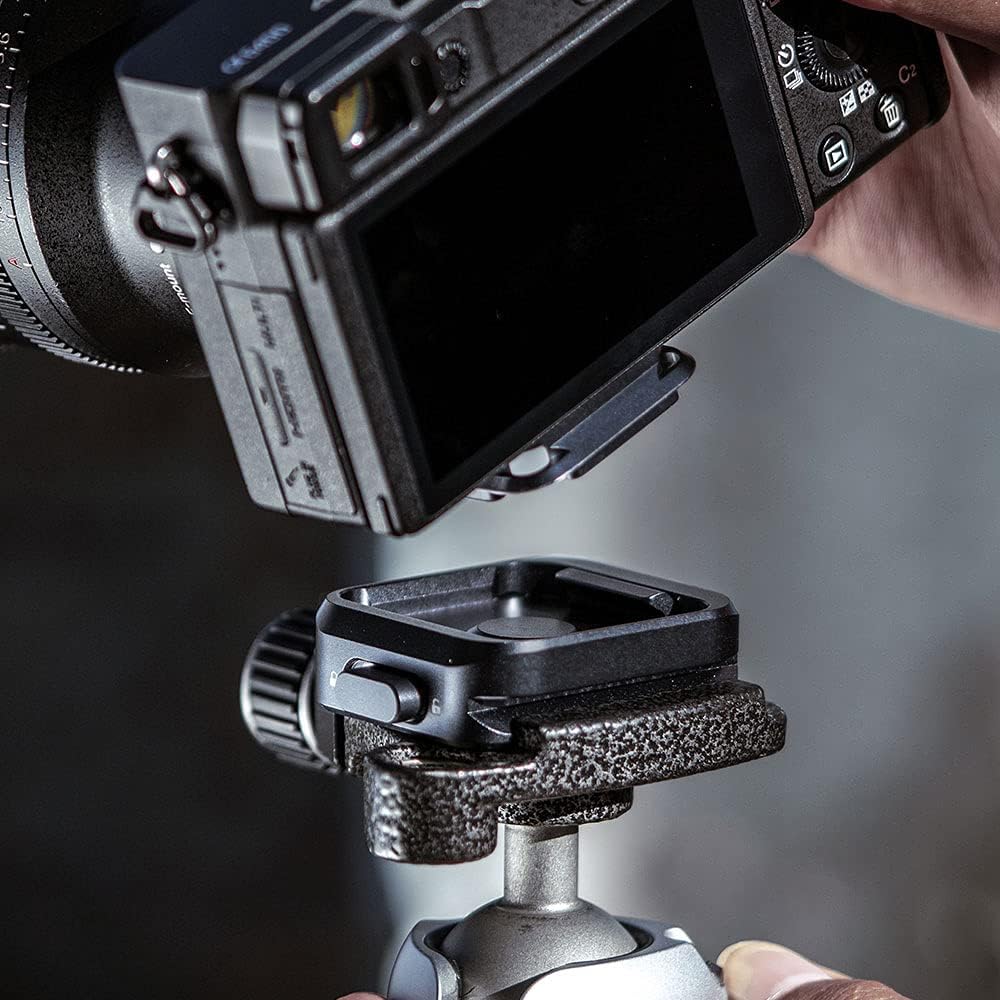

This is the fine bit of kit for the on-the-go camera setup that I can’t live without.
99% of the time I have my camera attached to my tripod. But sometimes there are situations where it’s a bit too much.
Maybe I’m on the subway and I want to do some street style video with the handheld camera. This quick release lets me detach the selfie stick and just use the camera, and then put it right back on in a couple seconds when I need to use it.
Or, maybe I want to put my camera away into my backpack and it’s harder to put this “whole thing” away. It would be easier to find a spot for the camera + mic and the selfie stick in another compartment. With the quick release, I can do that.
All you have to do is attach the base to the selfie stick, and the top to the bottom of the camera, and voila you can go handheld or stick mode and back-and-forth as quick as you like.
Oh, and the quick release plate has a locking mode so it’s not going to accidentally drop off if you brush against the release button.
Ask me how I know that’s important. . .
Selfie Stick / Tripod Combo

Maybe you’re at home and you want to do a talking head video with no motion and a steady camera. You need a tripod.
Maybe you’re on an adventure and you want to do a selfie-style vlog. You need a selfie stick.
Instead of having a tripod for one environment and a selfie stick for another, you need the powers of Captain Planet combined.
That’s what this thing is.
It’s fantastic.
I’ve literally taken this all over the world and it has never let me down.
It’s like having your own personal Transformer helping you get the perfect shot.
Memory Card

Since the camera can shoot in 4K, you want a memory card that has 1) enough space to hold files that large and 2) a card that can write that much data as fast as it needs to.
That means you want this card. You can shoot all sorts of stuff and not run out of room. It’s awesome.
It’s a tiny little thing, and it fits into the larger receiver card and that’s what fits into the camera.
The Old Camera & Accessories
Sony ZV-1: The Old Camera

I love this camera. It’s fast to turn on so I rarely miss a moment.
I use it for travel shots, talking head videos, bright sunlight, and darker studio environments.
It has all the manual control you need if you’re familiar with cameras/video, but if you don’t know what you’re doing (like me for the first 6 months I had this camera) then there is a wonderful “full auto” mode that’s hard to beat. I still use full auto when I’m traveling / on the move / outside with bright & dark patches.
Another detail that you don’t know you need until you got something that doesn’t work that way? The monitor screen flips to the SIDE instead of flipping UP. That’s a big deal because the screen that flips out lets you monitor yourself when you’re in selfie mode. But, if you have a screen that flips up, then you won’t be able to see it if you have a microphone attached to the top. Ask me how I know this. :facepalm:
So this one flips out to the side so I can still see myself even when I have the big fuzzy goofy looking microphone on top.
Deity Microphone
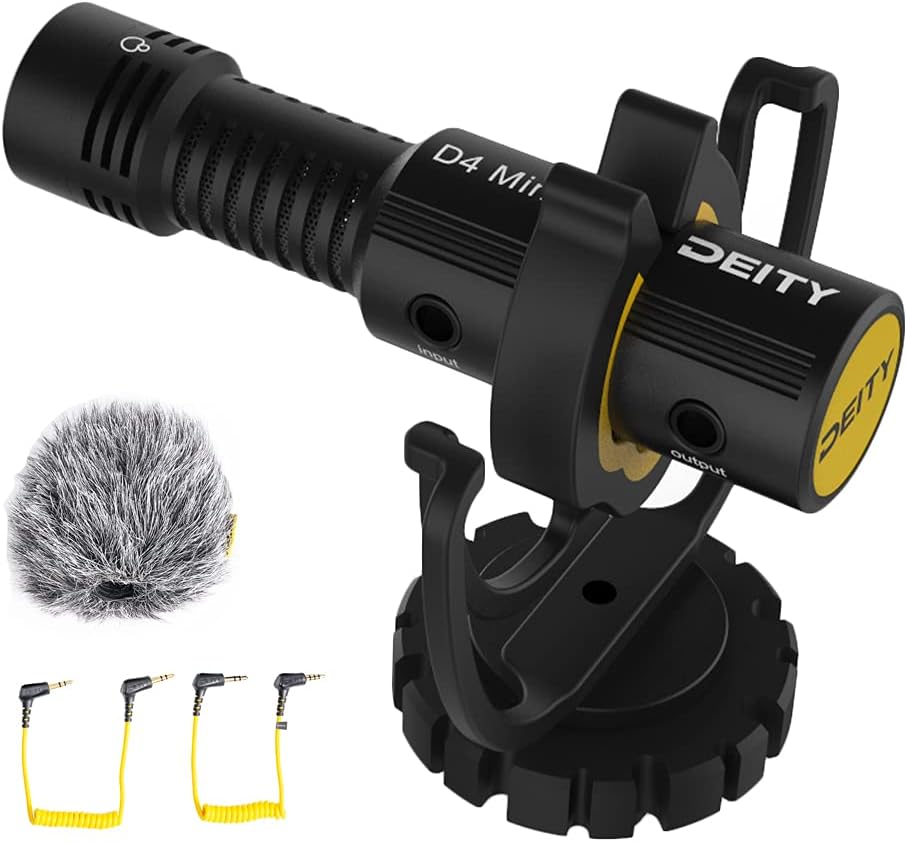
You can have the best video in the world, but if your audio is hot garbage, then people will leave your video faster than grainy video with perfect audio. Weird, but true.
That means that you need this microphone.
Sure, the Shure shotgun mic is more popular, but this one is more useful. That’s because it is a front AND back shotgun mic. If you’re talking to the lens in selfie mode, then the front mic will pick you up.
If you’re behind the camera narrating what’s going on, the back shotgun mic will pick you up on a separate channel.
That means that you can adjust levels independently when you’re editing your footage. The back mic was picking up nothing but noise? Cool, mute channel 2 and leave the front mic on channel 1.
Know you don’t need the back mic for awhile? Cool. There’s a switch on the mic to turn it off. Although, I know I’d forget to turn it back on, so I never switch it off. I prefer to mute its channel in post.
Also, the front & back mic works great for interviews. Your subject is in front of the mic on channel 1 and you’re behind asking questions on channel 2.
One mic for all those situations where the Shure would fall flat.
SmallRig Camera Cage

The camera + mic + tripod selfie is really all you need.
But you’ll quickly realize something isn’t quite right. And that’s the battery & memory card door is blocked by the selfie stick when it’s screwed in.
That means if you need to replace the battery or remove the memory card, you have to unscrew the camera from the selfie stick, swap out whatever needs swapping out, then screw the camera back onto the selfie stick.
It’s fine at first, but it gets old real fast.
Here comes the camera cage to the rescue.
This particular cage has a bunch of mounting spots all along the bottom so you can attach the selfie stick at a point that won’t block the battery/memory card door. Plus the cage has a big ol’ opening that lets the door swing open.
That means that instead of taking a minute or two to change a battery, I can now swap it out in under 10 seconds. If you’re shooting as much as me, that makes a huge difference. And you’ll wind up using it even more because you’re not frustrated at how clunky this thing is to use.
The easier it is to use a tool, the more you wind up using it, right?
Extra Batteries & Charger
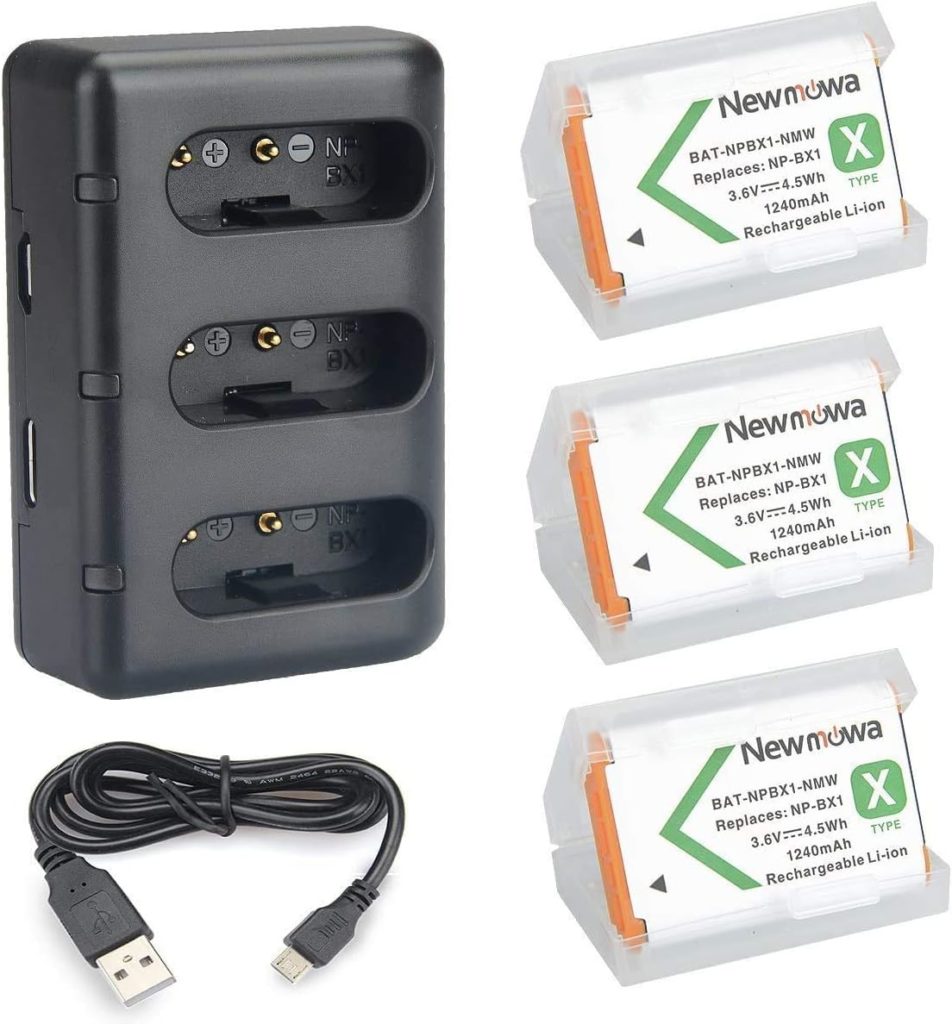
If you’re going to be prepared, it’s worth being over-prepared.
That’s why I bought these batteries & charger.
This, plus the battery that comes with the camera, means that you’re going to be able to shoot for a looooong time.
Plus, they’re small, so they don’t take up much space in your pocket, fanny pack, or backpack.
Studio
Green Screen & Backdrop Holder
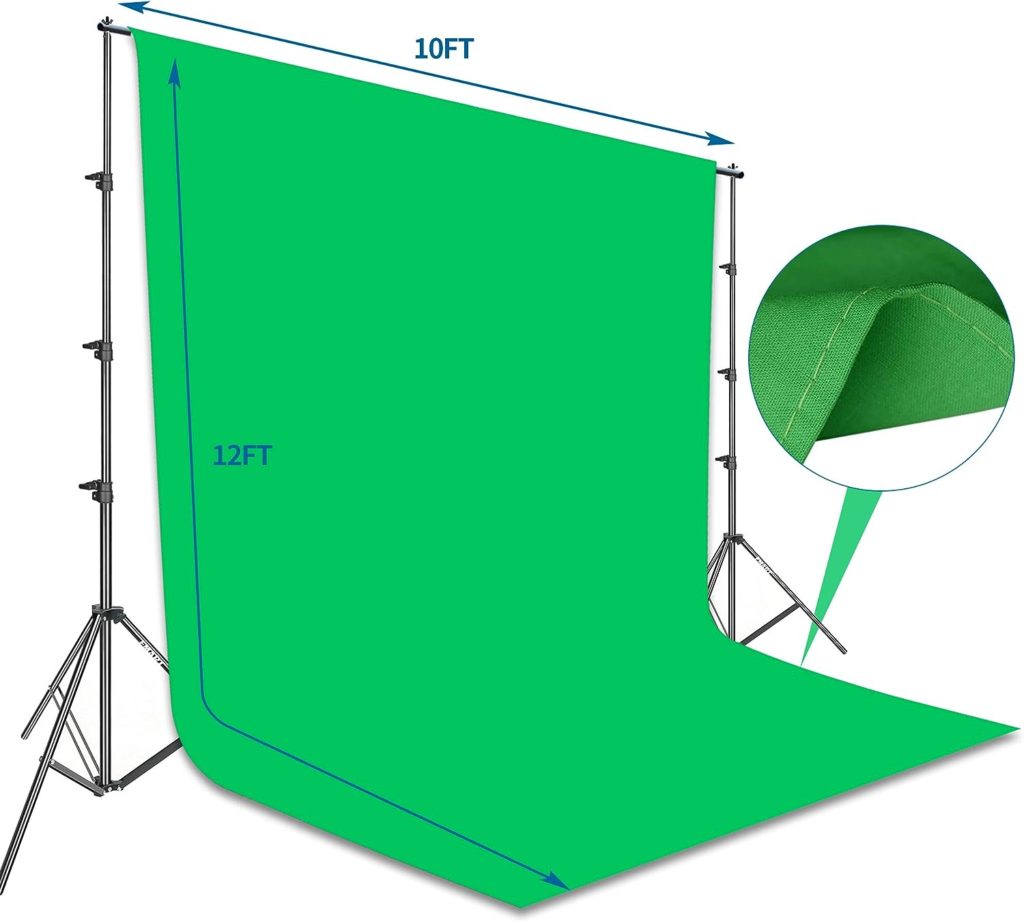
Back when I built out my studio I was still renting an apartment in Chicago. I couldn’t install anything permanently, so I needed a free-standing way to hold a backdrop.
This was my solution.
I never wound up using the green screen, but it’s nice to still have on hand if I ever needed to.
But it’s the frame that was most handy.
I used it to drape black backdrop curtains from, and I even used it to mount an overhead camera when I was doing Zoom shows.
(Those covid memories will never fade. . . )
Black Backdrops

This makes for a fantastic backdrop.
They’re relatively lightweight, tall as hell, and as wide as you need.
But the coolest part, however, is that they have just the right amount of sheen.
When you use LED up-lights, they reflect a lot of the light so you get a great spread of color on them.
Without that bit of reflective quality to them, you’d lose out on the benefits of lighting.
LED Up-Lights

LED lights run cool, are quiet, and put out a lot of light compared to the amount of electricity they use.
Buy two and you have a lot to work with.
Plug them in, cycle through the rainbow of available colors, and you’re good to go.
You can even save your favorite color and it will default to that setting when you turn it back on.
I put the two I own behind the couch and use them for all my YouTube videos to this day.
Ring Light

This is the light I use right next to the camera when I’m filming videos, now.
It has warm, neutral, and cold light settings to match your environment.
I usually shoot with neutral.
And it also has 10 levels of brightness for each, too.
I picked this version because it can stand on its own and not be too low if I want to stand up.
Don’t get a tabletop-only version. You’ll be mad you did. Get the tall one.
Hair Light

I put one of these right behind me so it helps provide a “halo” of light that separates me from the background.
If you want to get really fancy with it you can pick the gel that’s the complementary color of the LED uplights.
For example. If your background color is purple, pick the orange gel on the hair light to provide maximum contrast between your and the background. #ArtSchool
Software
Descript

If you edit any kind of “talking head” video or audio, then this is for you.
For years I would edit audio by listening at 2x speed, then trying to interpret the waveform of the dialogue, and figure out where to make the cut.
It was intensely time consuming, frustrating, and it’s one of the major reasons why I stopped making podcasts.
(I was spending 3 to 4 times as much time trying to edit the conversation as the time I spent talking with the guest. Ugh.)
But, then I found Descript.
If you’ve wondered how I’ve started putting out so many videos, shorts, and audiograms over the past year, then this is your answer.
There are two huge benefits that it offers.
- It transcribes your dialogue and puts it into text. Then, if you want to remove a word, or a whole section, then all you have to do is highlight the parts you don’t want and hit delete. It’s as easy as editing your writing and the video+audio is done too. :mindblown-emoji:
- There’s a feature called “Studio Sound” that fixes your audio with a single click. 99% of the time it’s 100x better than anything I could ever get out of Adobe Audition. I’m never going back.
So give it a shot if you do any audio and/or video editing and you’ll thank me later.
Obsidian

This single program can transform your whole life.
I highly recommend it for:
- Writers
- Authors
- Podcasters
- Magicians
- Artists
- Bakers
- Hobbiests
- Coders
- Everybody
I’ve done several videos explaining what it is, how to use it, and what you can accomplish in terms of personal productivity. And I’ll probably do more, too.
But, in short:
- It’s a lightweight program (that’s free),
- Runs locally (so you can use it even if you’re not connected to the internet),
- All the data is yours (they don’t have access to it so they’re not going to spy on you to sell your info to advertisers).
- Works on Mac, Windows, Linux, & Mobile (Android + iPhone)
The basic idea is that you can write notes, and then connect/hyperlink to other notes as you need to.
Now, that sounds so simple that it’s easy to miss how powerful that can be.
But imagine if you had a daily notebook that you could search in an instant.
Or a notebook of everything that you read online & your personal thoughts about it.
Maybe you want to use it as a CRM. Cool, you can do that too.
And the list goes on.
Brave Browser
Chrome is a massive memory hog, and there’s also the issue of tracking anything & everything you do.
Brave browser is the alternative I find myself using 99% of the time.
Services
Proton Mail
Proton is a sane alternative that helps you escape the all-seeing eye of Sauron Google.
It’s created & run by a group of privacy-minded computer scientists located in Switzerland, so you know your data is safe from prying eyes.
They have encrypted email, calendar, cloud storage, and more.
I use this for my personal & business emails and it comes highly recommended.
Use this link to get a free month to give it a thorough test-drive.
Apparel
Xero Shoes

If I’m being paid to be on stage, then I’m wearing some fancy dress shoes.
That’s the only time you’ll find me wearing anything but Xero Shoes.
I bought my first pair of weird-looking sandals nearly 10 years ago, and I was an instant convert to the barefoot “lifestyle.”
But, sometimes, I don’t want curious looks from strangers, so I prefer to wear more traditional-looking shoes that Xero started making awhile ago.
I have so many pair of so many different styles that I lost track a long time ago.
If you want shoes that let your feet do feet things, then pick any pair of Xero.
Final Note
That’s it for now. I’ll be adding more tools for other parts of my life as I get to it.
Most of the links go to Amazon & I get a little kickback if you buy it through me. It doesn’t cost you anything extra, and I get a little monetary reward for spending hours figuring this stuff out and sharing it with the world.